
Managing blog infrastructure as code
This article demonstrates how to import Cloudflare resources into OpenTofu code and manage them in GitLab.
Preface
When start building this blog, I thought about how to serve contents. I occasionally host tools for personal use temporarily on my home server, but maintaining a publicly accessible server securely over the long term is no easy task. Therefore, I decided that using cloud infrastructure was the best way to reliably deliver my blog to others. The cloud service providers (CSPs) I have experience with are Amazon Web Services (AWS) and Google Cloud Platform (GCP), and if private clouds count, OpenStack as well. However, I thought it would be worthwhile to challenge something new, so I decided to use Cloudflare. The web interface provided by Cloudflare for managing resources felt easier to use than the equivalents available on AWS or GCP in my opinion. That said, managing infrastructure as code is still preferable to clicking through settings—a lesson learned the hard way.
This article describes how I configured things. It’s not necessarily the optimal route, and there are some redundant steps, but I’ve intentionally left them—it might be useful to someone. I use Void Linux as OS and zsh as shell, so the command examples below assume that environment. While they shouldn’t differ significantly, please adjust them to suit your own setup.
Table of contents
- Import manually created resources into code
- Manage resource states remotely
- Pass credentials via environment variables
- Data-at-rest encryption for state files
- Using CI/CD
- Conclusion
Import manually created resources into code
Let me be honest. At first, I thought I could just quickly set things up using the web interface. But I reconsidered and decided to write it as code so future me wouldn’t get confused.
In the process of importing the resources I had already created into the code, I used a tool called cf-terraforming that is provided for this specific purpose. To begin with, a tool to work with tf files is needed. I use opentofu, but terraform is also an option, depending on your preference.
To build and install tofu into ~/.local/bin/:
git clone https://github.com/opentofu/opentofucd opentofugit checkout v1.11.3go build \ -ldflags '-w -s -X "github.com/opentofu/opentofu/version.dev=no"' \ -o ~/.local/bin/tofu \ ./cmd/tofuThe tofu version I used is as follows.
tofu versionOpenTofu v1.11.3on linux_amd64To download and install cf-terraforming on an x86-64 Linux machine:
install-cf-terraforming () { local -r os=linux local -r arch=amd64 local -r version=0.24.0 local -r sha256sum=35eb5c975f5c3ed7e7b822d665bb5cd533a1804d92625d4d62163ff3eaf12b49 local -r url=https://github.com/cloudflare/cf-terraforming/releases/download/v$version/cf-terraforming_${version}_${os}_$arch.tar.gz local -r download_dst=~/Downloads/cf-terraforming/${url##*/} local -r extract_dst=~/.local/share/cf-terraforming-$os-$arch-v$version local -r install_dst=~/.local/bin curl --create-dirs -Lo "$download_dst" "$url" sha256sum -c <<<"$sha256sum $download_dst" || return 1 tar xvf "$download_dst" --one-top-level=$extract_dst mkdir -pv "$install_dst" ln -srvft "$install_dst" "$extract_dst"/cf-terraforming}install-cf-terraformingThe cf-terraforming version I used is as follows.
cf-terraforming versioncf-terraforming v0.24.0Create a file provider.tf to configure the provider.
terraform { required_providers { cloudflare = { source = "cloudflare/cloudflare" version = "~> 5" } }}
provider "cloudflare" {}And then initialize the working directory.
tofu initOutput
Initializing the backend...
Initializing provider plugins...- Finding cloudflare/cloudflare versions matching "~> 5.0"...- Installing cloudflare/cloudflare v5.15.0...- Installed cloudflare/cloudflare v5.15.0 (signed, key ID C76001609EE3B136)
Providers are signed by their developers.If you'd like to know more about provider signing, you can read about it here:https://opentofu.org/docs/cli/plugins/signing/
OpenTofu has created a lock file .terraform.lock.hcl to record the providerselections it made above. Include this file in your version control repositoryso that OpenTofu can guarantee to make the same selections by default whenyou run "tofu init" in the future.
OpenTofu has been successfully initialized!
You may now begin working with OpenTofu. Try running "tofu plan" to seeany changes that are required for your infrastructure. All OpenTofu commandsshould now work.
If you ever set or change modules or backend configuration for OpenTofu,rerun this command to reinitialize your working directory. If you forget, othercommands will detect it and remind you to do so if necessary.
The above command installs the provider under directory .terraform/ and creates a file .terraform.lock.hcl containing its information. If you are managing your code with Version Control System (VCS) such as Git or Jujutsu (and I think you should be), now would be a good time to create a .gitignore file.
Below is an example of basic configuration. Depending on the situation, you may also want to add files such as *.auto.tfvars. The key point is that the lock file is managed in VCS.
.terraform/*.tfstate*.tfstate.*Before executing cf-terraforming, set several environment variables.
First, set an API token for operating Cloudflare resources to variable CLOUDFLARE_API_TOKEN. That can be created in API Tokens. Settings vary depending on the use case, but in this example, permission to edit DNS was granted.
To configure the zone settings, you need to set the Zone ID to CLOUDFLARE_ZONE_ID, which can be found at Account Home. For more details, please refer to Find account and zone IDs.
Finally, specify the binary path to allow cf-terraforming to run tofu.
export CLOUDFLARE_API_TOKEN=Hzsq3Vub-7Y-hSTlAaLH3Jq_YfTUOCcgf22_Fs-jexport CLOUDFLARE_ZONE_ID=d8b3ea000123deadbeef456787959185CLOUDFLARE_TERRAFORM_BINARY_PATH=$(command -v tofu)export CLOUDFLARE_TERRAFORM_BINARY_PATHNow it’s time to generate the code. Here we import cloudflare_dns_record, but you can check the Supported Resource Types for other resource types.
cf-terraforming generate \ --resource-type cloudflare_dns_record | tee dns.tfExecuting the above command should create a file named dns.tf that looks like the following.
resource "cloudflare_dns_record" "terraform_managed_resource_df2efc022011c2adcc0f401c7c53731e_0" { content = "198.51.100.1" name = "docs.example.com" proxied = true tags = [] ttl = 1 type = "A" zone_id = "d8b3ea000123deadbeef456787959185" settings = {}}
resource "cloudflare_dns_record" "terraform_managed_resource_aebdaa573101d6425d2e0a5d2e9066d9_1" { content = "3fff::1" name = "shop.example.com" proxied = true tags = [] ttl = 1 type = "AAAA" zone_id = "d8b3ea000123deadbeef456787959185" settings = {}}At this point, the code representing the infrastructure has been created, but its state is not yet managed by the tool. To import resources into the tool’s management environment, additional steps are required.
cf-terraforming import \ --modern-import-block \ --resource-type cloudflare_dns_record | tee import-dns.tfThe above command creates a file import-dns.tf containing import blocks like the one below.
import { to = cloudflare_dns_record.terraform_managed_resource_df2efc022011c2adcc0f401c7c53731e_0 id = "d8b3ea000123deadbeef456787959185/df2efc022011c2adcc0f401c7c53731e"}
import { to = cloudflare_dns_record.terraform_managed_resource_aebdaa573101d6425d2e0a5d2e9066d9_1 id = "d8b3ea000123deadbeef456787959185/aebdaa573101d6425d2e0a5d2e9066d9"}I changed the automatically generated names like terraform_managed_resource_df2efc022011c2adcc0f401c7c53731e_0 to something more understandable, but that’s up to personal preference. You can now import the resources using the following command.
tofu applyOnce the import is complete, file import-dns.tf can be deleted.
Manage resource states remotely
Local state file terraform.tfstate contains resource details, so it is generally recommended not to commit it to VCS. However, managing it separately from the repository is a pain and something you probably don’t want to do. Fortunately, GitLab has a feature that handles this for us.
Create a file backend.tf that sets the backend to http.
terraform { backend "http" { }}A GitLab personal access token is required. This can be created on the web, and the only required scope is the api. Also, set the username and project ID. Note that the project ID is different from the repository name. For details, see Find the Project ID.
gitlab_access_token=glpat-xxxxxxxxxxxxxxxxxxxxxxxxxxxxxxxxxxxxxxxxxxxxxxxxxgitlab_username=example-usergitlab_project_id=87654321You can store multiple states in a single repository. Set a name that are meaningful to you.
state_name=example-stateOnce you have set the above variables, you can save the state to the remote.
tofu init \ -backend-config=address=https://gitlab.com/api/v4/projects/${gitlab_project_id:?}/terraform/state/${state_name:?} \ -backend-config=lock_address=https://gitlab.com/api/v4/projects/${gitlab_project_id:?}/terraform/state/${state_name:?}/lock \ -backend-config=unlock_address=https://gitlab.com/api/v4/projects/${gitlab_project_id:?}/terraform/state/${state_name:?}/lock \ -backend-config=username=${gitlab_username:?} \ -backend-config=password=${gitlab_access_token:?} \ -backend-config=lock_method=POST \ -backend-config=unlock_method=DELETE \ -backend-config=retry_wait_min=5In my case, since this state with the given name did not exist remotely, an option to copy it from the local source was presented.
Initializing the backend...Acquiring state lock. This may take a few moments...Do you want to copy existing state to the new backend?  Pre-existing state was found while migrating the previous "local" backend to the  newly configured "http" backend. No existing state was found in the newly  configured "http" backend. Do you want to copy this state to the new "http"  backend? Enter "yes" to copy and "no" to start with an empty state.
  Enter a value:
Entering yes not only initializes the remote state but also copies the local value.
  Enter a value: yes
Releasing state lock. This may take a few moments...
Successfully configured the backend "http"! OpenTofu will automaticallyuse this backend unless the backend configuration changes.
Initializing provider plugins...- Reusing previous version of cloudflare/cloudflare from the dependency lock file- Using previously-installed cloudflare/cloudflare v5.15.0
OpenTofu has been successfully initialized!
You may now begin working with OpenTofu. Try running "tofu plan" to seeany changes that are required for your infrastructure. All OpenTofu commandsshould now work.
If you ever set or change modules or backend configuration for OpenTofu,rerun this command to reinitialize your working directory. If you forget, othercommands will detect it and remind you to do so if necessary.
The state saved remotely can be checked in https://gitlab.com/<GITLAB_USERNAME>/<PROJECT_NAME>/-/terraform.
If you later decide to change the state’s name, you can do so as follows.
new_state_name=defaulttofu init \ -migrate-state \ -backend-config=address=https://gitlab.com/api/v4/projects/${gitlab_project_id:?}/terraform/state/${new_state_name:?} \ -backend-config=lock_address=https://gitlab.com/api/v4/projects/${gitlab_project_id:?}/terraform/state/${new_state_name:?}/lock \ -backend-config=unlock_address=https://gitlab.com/api/v4/projects/${gitlab_project_id:?}/terraform/state/${new_state_name:?}/lock \ -backend-config=username=${gitlab_username:?} \ -backend-config=password=${gitlab_access_token:?} \ -backend-config=lock_method=POST \ -backend-config=unlock_method=DELETE \ -backend-config=retry_wait_min=5Pass credentials via environment variables
Since I migrated the state to remote in the previous section, the local state file is now just an empty file.
stat -c %s terraform.tfstate0On the other hand, the information for connecting to the backend is stored in file .terraform/terraform.tfstate, which includes the previously specified personal access token.
{ "version": 3, "serial": 2, "lineage": "a2d0b9dd-6eed-b4c3-29e0-92c8c2fd3b12", "backend": { "type": "http", "config": { "address": "https://gitlab.com/api/v4/projects/87654321/terraform/state/default", "client_ca_certificate_pem": null, "client_certificate_pem": null, "client_private_key_pem": null, "headers": null, "lock_address": "https://gitlab.com/api/v4/projects/87654321/terraform/state/default/lock", "lock_method": "POST", "password": "glpat-xxxxxxxxxxxxxxxxxxxxxxxxxxxxxxxxxxxxxxxxxxxxxxxxx", "retry_max": null, "retry_wait_max": null, "retry_wait_min": 5, "skip_cert_verification": null, "unlock_address": "https://gitlab.com/api/v4/projects/87654321/terraform/state/default/lock", "unlock_method": "DELETE", "update_method": null, "username": "example-user" }, "hash": 2984870146 }, "modules": [ { "path": [ "root" ], "outputs": {}, "resources": {}, "depends_on": [] } ]}The following is a quote from the OpenTofu Docs.
Warning: We recommend using environment variables to supply credentials and other sensitive data. If you use
-backend-configor hardcode these values directly in your configuration, OpenTofu will include these values in both the.terraformsubdirectory and in plan files. Refer to Credentials and Sensitive Data for details.
As described, I executed the previous command with the -backend-config option specified, causing that information to be saved to the file. To follow the recommendation and pass credentials via environment variables, add a few lines to backend.tf as shown below.
locals { backend_address = "https://gitlab.com/api/v4/projects/${var.project_id}/terraform/state/${var.state_name}"}
terraform { backend "http" { address = local.backend_address lock_address = "${local.backend_address}/lock" unlock_address = "${local.backend_address}/lock" lock_method = "POST" unlock_method = "DELETE" retry_wait_min = 5 username = var.gitlab_username }}To avoid repetition and for brevity, I created several variables.
variable "state_name" { description = "Name of the state saved in GitLab" type = string}
variable "project_id" { description = "Project ID of this repository" type = number}
variable "gitlab_username" { description = "GitLab username" type = string}Set the values of the variables in file terraform.tfvars. I don’t consider these values to be sensitive, but depending on their content, there may be cases where it’s better not to include them in the repository.
state_name = "default"project_id = 87654321gitlab_username = "example-user"Since the personal access token is a credential, it is passed as an environment variable TF_HTTP_PASSWORD at runtime.
export TF_HTTP_PASSWORD=${gitlab_access_token:?}Apply these settings.
tofu init -reconfigureAfter that, you can confirm that the credential is no longer saved to the file.
{ "version": 3, "serial": 3, "lineage": "a2d0b9dd-6eed-b4c3-29e0-92c8c2fd3b12", "backend": { "type": "http", "config": { "address": "https://gitlab.com/api/v4/projects/87654321/terraform/state/default", "client_ca_certificate_pem": null, "client_certificate_pem": null, "client_private_key_pem": null, "headers": null, "lock_address": "https://gitlab.com/api/v4/projects/87654321/terraform/state/default/lock", "lock_method": "POST", "password": null, "retry_max": null, "retry_wait_max": null, "retry_wait_min": 5, "skip_cert_verification": null, "unlock_address": "https://gitlab.com/api/v4/projects/87654321/terraform/state/default/lock", "unlock_method": "DELETE", "update_method": null, "username": "example-user" }, "hash": 2269132671 }, "modules": [ { "path": [ "root" ], "outputs": {}, "resources": {}, "depends_on": [] } ]}Managing credentials passed to tools
With the setup so far, I now have to handle two environment variables, CLOUDFLARE_API_TOKEN and TF_HTTP_PASSWORD. So, how should I manage these? Setting these variables in ~/.zprofile or ~/.bash_profile would be defeating the purpose.
What I’m using is pass, which is a command-line interface (CLI) password manager. Combining pass with a YubiKey enables the retrieval of credentials only when necessary, using a physical key and passphrase. I won’t cover YubiKey setup here, but I’d like to create a separate entry for it at some point.
To install pass on Void Linux:
sudo xbps-install passThe version I used is as follows.
pass version============================================= pass: the standard unix password manager == == v1.7.4 == == Jason A. Donenfeld == Jason@zx2c4.com == == http://www.passwordstore.org/ =============================================This utility stores passwords in encrypted files using the GNU Privacy Guard (GnuPG or GPG). For details and examples, please refer to the man page.
If this is your first time using pass, you must first initialize the password store with GPG ID.
pass init user@example.comThe above command creates a directory at $PASSWORD_STORE_DIR, which defaults to ~/.password-store.
Let’s save the GitLab personal access token created earlier. Here, the hierarchy example-project/gitlab.com/personal-access-token is used.
pass insert example-project/gitlab.com/personal-access-tokenmkdir: created directory '/home/example-user/.password-store/example-project'mkdir: created directory '/home/example-user/.password-store/example-project/gitlab.com'Enter password for example-project/gitlab.com/personal-access-token:Retype password for example-project/gitlab.com/personal-access-token:[main 47f928f] Add given password for example-project/gitlab.com/personal-access-token to store. 1 file changed, 0 insertions(+), 0 deletions(-) create mode 100644 example-project/gitlab.com/personal-access-token.gpgTo retrieve the saved value:
pass show example-project/gitlab.com/personal-access-tokenglpat-xxxxxxxxxxxxxxxxxxxxxxxxxxxxxxxxxxxxxxxxxxxxxxxxxSince the password store is just a git repository after all, even if you accidentally overwrite a value, you can undo it like this:
pass git revert HEADIf you’re interested in the contents of the generated file, it can be inspected as follows.
gpg -v --list-packets \ ${PASSWORD_STORE_DIR:-~/.password-store}/example-project/gitlab.com/personal-access-token.gpgSimilarly, save the Cloudflare API token in example-project/cloudflare.com/user-api-token.
pass insert example-project/cloudflare.com/user-api-tokenAt this point, credentials are stored in encrypted form and can be retrieved as needed, but with a few more tweaks to make them even easier to use. pass allows users to execute scripts placed under $PASSWORD_STORE_EXTENSIONS_DIR, which defaults to $PASSWORD_STORE_DIR/.extensions, as alternative commands. Save the following script as tofu.bash in $PASSWORD_STORE_EXTENSIONS_DIR.
#!/usr/bin/bash
set -eu[[ "${PASS_TOFU_VERBOSE-}" != 2 ]] || set -x
pass_names=$(pwd)/.passreadonly pass_namesreadonly cmd=tofu
if [[ -e "$pass_names" ]]; then while read -r line; do key=${line%%=*} name=${line#*=} val=$(pass show "$name") export "$key"="$val" [[ "${PASS_TOFU_VERBOSE-}" != 1 ]] || printf '"%s" has been set by "%s"\n' "$key" "$name" done <"$pass_names"fi! [[ "${PASS_TOFU_VERBOSE-}" =~ ^[12]$ ]] || printf '\n'
exec "$cmd" "$@"Make that file executable.
chmod -c u+x \ ${PASSWORD_STORE_EXTENSIONS_DIR:-${PASSWORD_STORE_DIR:-~/.password-store}/.extensions}/tofu.bashTo enable extensions, you must set PASSWORD_STORE_ENABLE_EXTENSIONS to true.
export PASSWORD_STORE_ENABLE_EXTENSIONS=trueTo have it set automatically upon login, add the above line to ~/.zprofile, ~/.bash_profile, etc.
Creating a file named .pass in the directory where the tf files resides. The format is separated by =, with the left side being the environment variable name you want to set, and the right side being the path within pass where it is stored.
CLOUDFLARE_API_TOKEN=example-project/cloudflare.com/user-api-tokenTF_HTTP_PASSWORD=example-project/gitlab.com/personal-access-tokenExecute the tofu command with pass preceding it. Setting PASS_TOFU_VERBOSE to 1 will output which variables were set.
PASS_TOFU_VERBOSE=1 pass tofu plan"CLOUDFLARE_API_TOKEN" has been set by "example-project/cloudflare.com/user-api-token""TF_HTTP_PASSWORD" has been set by "example-project/gitlab.com/personal-access-token"
Acquiring state lock. This may take a few moments...cloudflare_dns_record.terraform_managed_resource_df2efc022011c2adcc0f401c7c53731e_0: Refreshing state... [id=df2efc022011c2adcc0f401c7c53731e]cloudflare_dns_record.terraform_managed_resource_aebdaa573101d6425d2e0a5d2e9066d9_1: Refreshing state... [id=aebdaa573101d6425d2e0a5d2e9066d9]
No changes. Your infrastructure matches the configuration.
OpenTofu has compared your real infrastructure against your configuration and found no differences, so no changes are needed.Releasing state lock. This may take a few moments...Data-at-rest encryption for state files
At this point, the state file should be managed remotely, and I believe that environment is sufficiently trustworthy. However, since OpenTofu provides encryption for state and plan files at rest, let’s take advantage of it.
Generate a passphrase using pass for example-project/tf-passphrase.
pass generate -n example-project/tf-passphrase 100Add the following line to the .pass file created earlier.
CLOUDFLARE_API_TOKEN=example-project/cloudflare.com/user-api-tokenTF_HTTP_PASSWORD=example-project/gitlab.com/personal-access-tokenTF_VAR_passphrase=example-project/tf-passphraseCreate a file named encryption.tf that describes the encryption settings.
variable "passphrase" { sensitive = true}
terraform { encryption { method "unencrypted" "migrate" {}
key_provider "pbkdf2" "state" { passphrase = var.passphrase }
method "aes_gcm" "state" { keys = key_provider.pbkdf2.state }
state { method = method.aes_gcm.state
fallback { method = method.unencrypted.migrate } } }}Migrate unencrypted state to encrypted one.
pass tofu applyWhen you download the encrypted state file from https://gitlab.com/<GITLAB_USERNAME>/<PROJECT_NAME>/-/terraform, its contents should look something like this:
{ "serial": 2, "lineage": "dfda5a40-39fd-7617-1877-8dad24da69b2", "meta": { "key_provider.pbkdf2.state": "<KEY_PROVIDER_PBKDF2_STATE>" }, "encrypted_data": "<ENCRYPTED_DATA>", "encryption_version": "v0"}The unencrypted method configured in encryption.tf was temporary for migration purpose, so remove it and enforce encryption.
variable "passphrase" { sensitive = true}
terraform { encryption { method "unencrypted" "migrate" {}
key_provider "pbkdf2" "state" { passphrase = var.passphrase }
method "aes_gcm" "state" { keys = key_provider.pbkdf2.state }
state { method = method.aes_gcm.state
fallback { method = method.unencrypted.migrate } method = method.aes_gcm.state enforced = true } }}If you also want to encrypt the plan file, not just the state file, you can do so by creating a plan block similar to the state block.
variable "passphrase" { sensitive = true}
terraform { encryption { key_provider "pbkdf2" "state" { passphrase = var.passphrase }
method "aes_gcm" "state" { keys = key_provider.pbkdf2.state }
plan { method = method.aes_gcm.state enforced = true }
state { method = method.aes_gcm.state enforced = true } }}This time, since this change is applied without a plan file existing, I didn’t need to go through the unencrypted fallback method like before.
Using CI/CD
For personal websites, owners can basically update them whenever they like. However, for team projects, allowing each member to freely create or delete resources at their own timing can lead to problems. To ensure smooth code reviews and merge processes, leveraging CI/CD can be helpful. I’ll briefly explain how to utilize GitLab CI/CD pipelines here.
As written in .pass, the environment variables passed to the tofu command in the local environment are the followings:
CLOUDFLARE_API_TOKENTF_HTTP_PASSWORDTF_VAR_passphrase
These variables will need to be present in the CI/CD environment. When running locally, TF_HTTP_PASSWORD was set to a personal access token, but it is preferable to set a separate token when running remotely. For this purpose, create a Project Access Token, which can be generated in https://gitlab.com/<GITLAB_USERNAME>/<PROJECT_NAME>/-/settings/access_tokens. According to the documentation, the token’s role must be set to Maintainer to manage state files. For the scope, selecting api is sufficient.
You can also create another token for CLOUDFLARE_API_TOKEN instead of using the one used previously, but the TF_VAR_passphrase must remain identical.
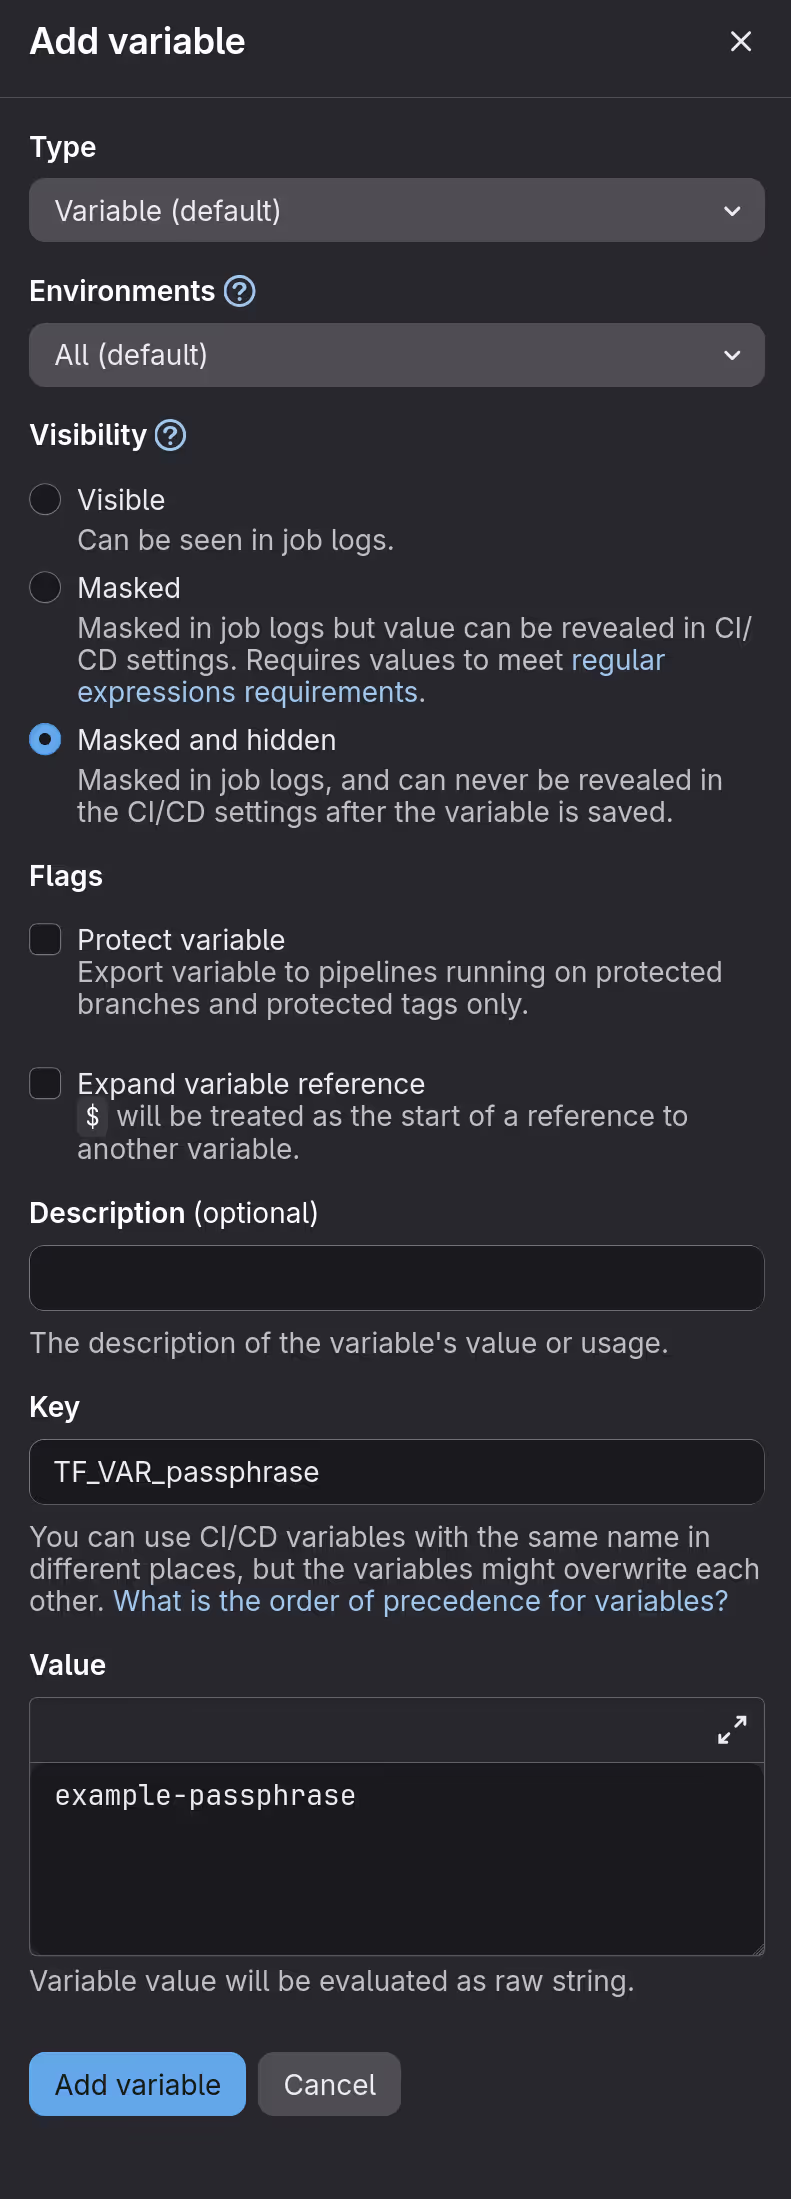
To make these variables available in CI/CD environments, configure them in https://gitlab.com/<GITLAB_USERNAME>/<PROJECT_NAME>/-/settings/ci_cd.
Screenshot of the interface for adding variables
Pipeline configuration is done in the .gitlab-ci.yml file located in the top-level directory of the repository. Let’s first try it with the minimal settings.
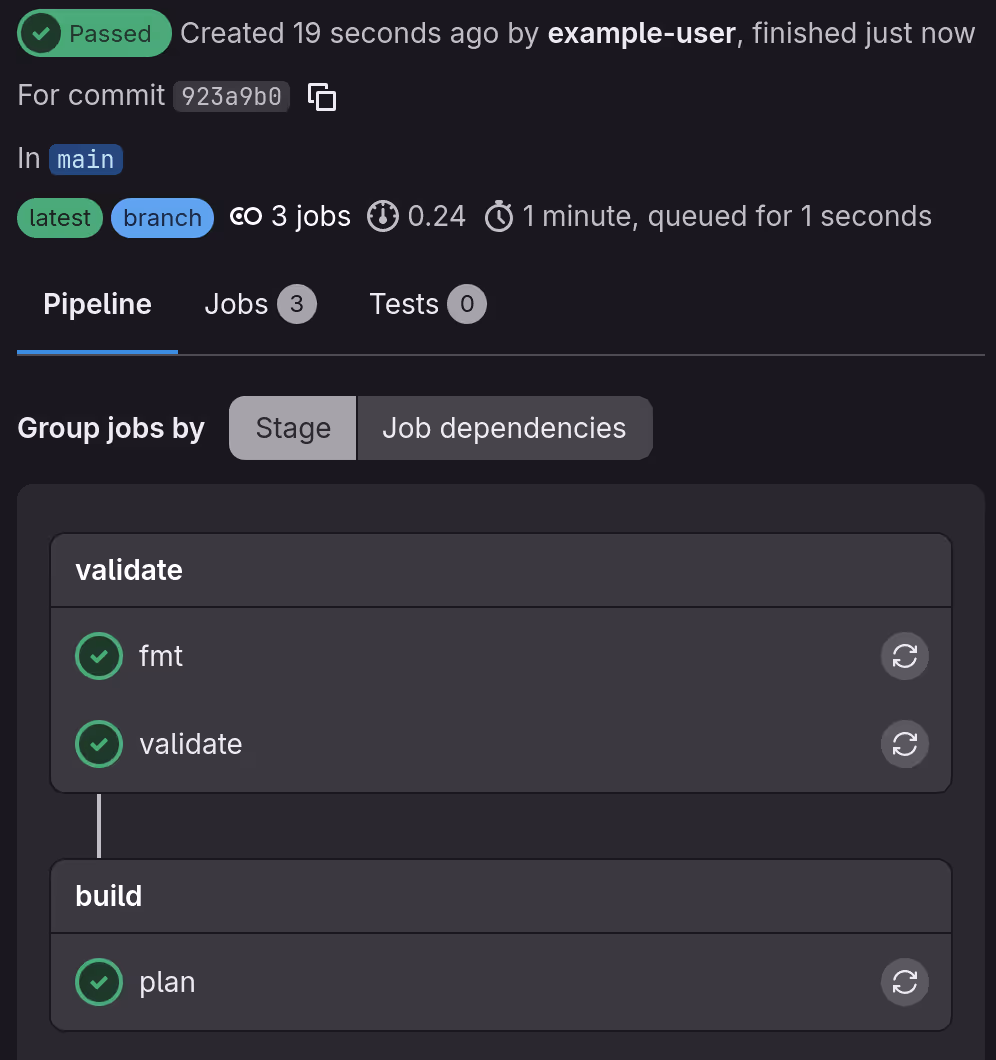
include:- component: gitlab.com/components/opentofu/validate-plan@4.2.0After pushing the commit that created the above file, you can see that the pipeline has been executed at https://gitlab.com/<GITLAB_USERNAME>/<PROJECT_NAME>/-/pipelines.
Screenshot of the pipeline status
What the above setting do is essentially execute the following commands as jobs:
tofu fmttofu validatetofu plan
As a more practical example, let’s have a bot to automatically post plans generated from merge requests. To do this, set the CI/CD variable GITLAB_TOFU_TOKEN to the same value you previously set for TF_HTTP_PASSWORD, then edit the configuration file as follows.
workflow: rules: - if: $CI_PIPELINE_SOURCE == "merge_request_event" - if: $CI_COMMIT_BRANCH && $CI_OPEN_MERGE_REQUESTS when: never - if: $CI_COMMIT_BRANCH
stages:- validate- build- deploy
include:- component: gitlab.com/components/opentofu/job-templates@4.2.0 inputs: use_rootless_image: true lockfile: readonly plan_artifacts_access: developer post_mr_plan_comment: true
fmt: extends: - .opentofu:fmt allow_failure: false rules: - if: $CI_COMMIT_BRANCH == $CI_DEFAULT_BRANCH - if: $CI_MERGE_REQUEST_TARGET_BRANCH_NAME == $CI_DEFAULT_BRANCH
validate: extends: - .opentofu:validate rules: - if: $CI_COMMIT_BRANCH == $CI_DEFAULT_BRANCH - if: $CI_MERGE_REQUEST_TARGET_BRANCH_NAME == $CI_DEFAULT_BRANCH
plan: extends: - .opentofu:plan rules: - if: $CI_MERGE_REQUEST_TARGET_BRANCH_NAME == $CI_DEFAULT_BRANCH when: manual
fetch-mr-plan: extends: - .opentofu:fetch-mr-plan rules: - if: $CI_COMMIT_BRANCH == $CI_DEFAULT_BRANCH
apply: extends: - .opentofu:apply rules: - if: $CI_COMMIT_BRANCH == $CI_DEFAULT_BRANCHAfter pushing .gitlab-ci.yml, let’s try creating a new resource. In this example, a new DNS record is added.
variable "zone_id" { type = string}
data "cloudflare_zone" "this" { zone_id = var.zone_id}
resource "cloudflare_dns_record" "mr_example" { name = "mr.${data.cloudflare_zone.this.name}" ttl = 1 type = "A" zone_id = data.cloudflare_zone.this.zone_id content = "192.0.2.1"}In terraform.tfvars, set the value you previously assigned to CLOUDFLARE_ZONE_ID to the variable named zone_id.
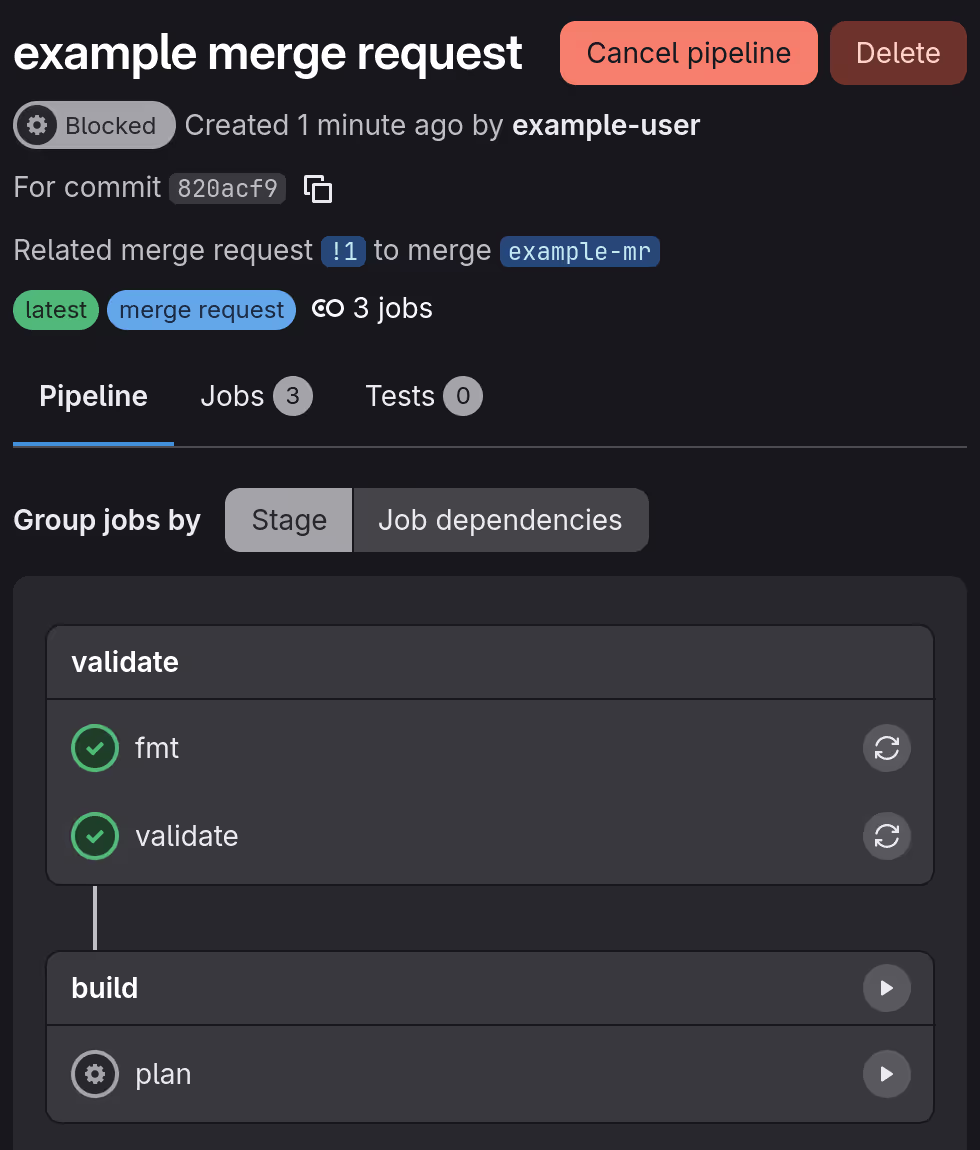
state_name = "default"project_id = 87654321gitlab_username = "example-user"zone_id = "d8b3ea000123deadbeef456787959185"When you create a merge request for the above changes, the pipeline will run. fmt and validate are performed automatically, but since plan is configured to run manually, user interaction is required to proceed.
Screenshot of the pipeline status after merge request created
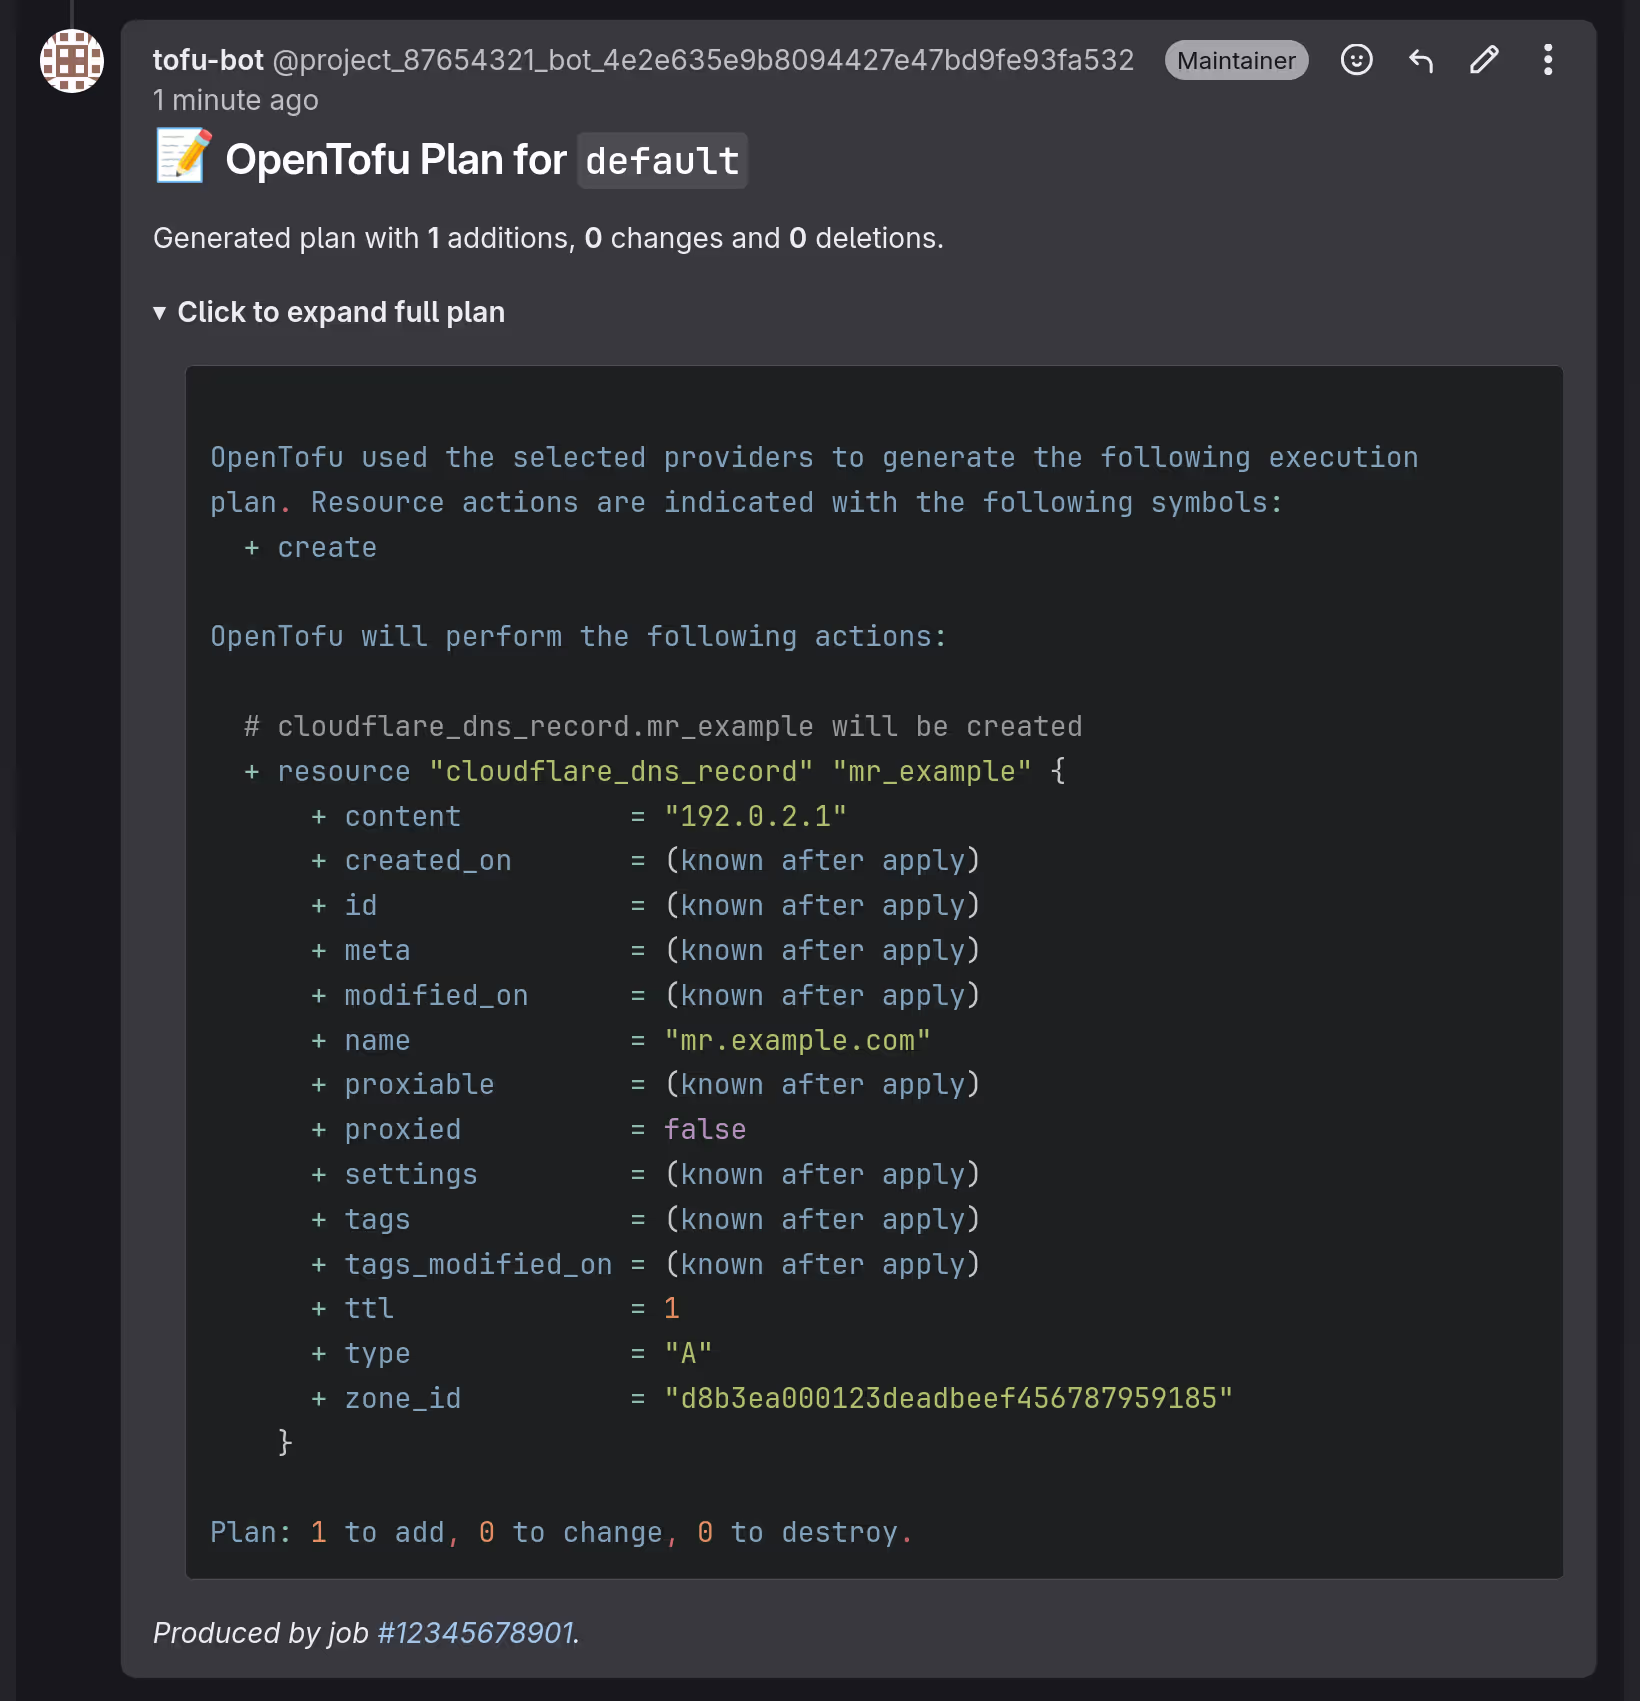
When you run plan, the bot will post the results to the merge request.
Screenshot of the comment posted on the merge request
The plan results can be downloaded from https://gitlab.com/<GITLAB_USERNAME>/<PROJECT_NAME>/-/artifacts. Once the changes are merged, the pipeline will run up to the apply step on the default branch using the uploaded plan.
Screenshot of the pipeline status after merged
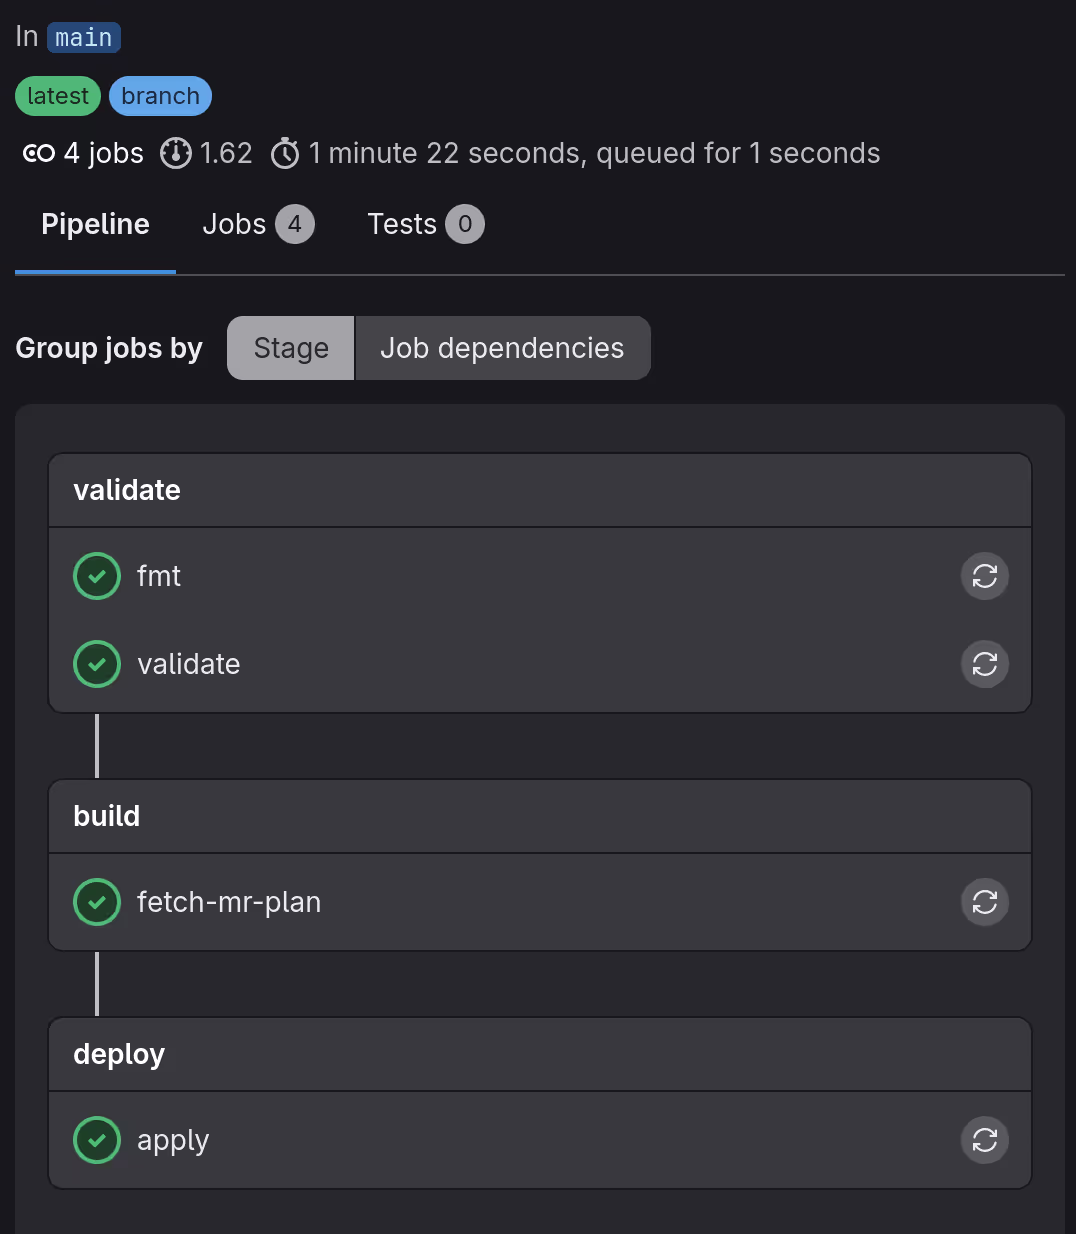
Conclusion
Managing infrastructure in business operations requires careful handling, as failures can lead to losses. This makes trial and error difficult and opportunities for mastery scarce. Personal projects like blogs, however, pose little risk even if they fail, making them excellent opportunities for practice.
This was my first time using GitLab CI/CD, and while it seems similar to GitHub Actions, there are many differences, which I found interesting. Trying out various options rather than sticking to a single platform is also an effective way to avoid lock-in.
Since development environments are changing rapidly, fueled by the AI trend, I wish to continually seek out diverse experiences and hope to share them through this blog.